This Beginners Guide for ISEPS (Idle Space Energy Simulator) will show you the basics of the game and will allow you to be able to push through content easier and avoid costly mistakes.
First things first, I want to start off by saying that ISEPS was made with the intention of making you use your brain. If you have ever played other similarly extensive idle games in the past (Like Sandcastle Builder, Antimatter Dimensions, Realm Grinder or Swarm Simulator, just to name a few), then you already know that there is extensive strategy required to feel consistent progress. Nothing in this game requires In-App Purchases! MOST walls you encounter are passable and likely you’re missing a small component to make huge progress. There are optimal paths(Meta) and other paths. Some other paths will hardstop you. The further into the game, and especially when reaching the furthest reaches of content, that’s when you may experience walls that take an exorbitant amount of time… Patience will pay off here.
Moreover you can sync your account and play ISEPS on PC, that way, it can run 24/7 and you will get maximum gains without draining your phone battery, its lifespan and having the game on all the time.
In order to play ISEPS and other mobile games on PC you can Download LDPlayer Android Emulator. After you download it, just sign in Google Play and use it as your other Android device.
You can also check out this video guide for Singularity 1-5:
Meaning of letters and Scientific Notation in ISEPS
Real quick, I’m gonna drop in the ranges of zeros for each letter. The game currently uses letters until it switches to Scientific Notation. It’s sometimes difficult to convert them. As you use different calculators, MathBot or start to reach the scientific notation of numbers in the game, this table should help as a quick-reference.
| 1 | 1e0 | 1t | 1e12 | 1S | 1e24 |
| 1k | 1e3 | 1qa | 1e15 | 1O | 1e27 |
| 1m | 1e6 | 1Qu | 1e18 | 1N | 1e30 |
| 1b | 1e9 | 1s | 1e21 | 1D | 1e33 |
Letters!: k = thousand; m = million; b = billion; t = trillion; qa = quadrillion; Qu = Quintillion
s = sextillion; S = Septillion; O = Octillion; N = Nonillion; D = Decillion
After the letter notation ‘D’, it transitions to purely scientific notation in the form of #.##e36+
How to properly play ISEPS as an Idle Game
For anyone wanting to idle ISEPS for any significant period of time… you would be well advised to check out Proximity Service and Pixel Filter.
Proximity Service is a free app that allows you to turn your device over and leaves your screen black while still having ISEPS active, essentially reducing heat and power consumption significantly.
Pixel Filter is an app that allows you to customize the pixels that are rendered or visible on your device’s screen. You can also disable particles under Settings>Battery Saver.
Newer Samsung phones also feature Samsung Game Booster which dims the screen and keeps it on while preventing users from accidentally touching anything on screen.
Other things you can do to help your phone out are Turning down/off particles under the settings>Battery Saving.
Do not idle on highly upgraded particles. It’s a huge battery drain. Turning off particles is the best way to combat this.
Glossary
EP – Energy Price. Used for purchasing basic particle upgrades and researches.
Particles – Alpha, Beta, Ceti etc. These are used to progress the game.
AP – All Particles. A separate bonus from various sources that applies to every particle.
Lab – Beta Laboratory
Ege – Egetuarium
CoT – City of Tomorrow
TP/LP – Talent Points/Level Points. Used interchangeably
Tokens – One is gained from every ad; these are used in the Token Center. You can upgrade Supplies/BBot to gain more over time.
Crystals – A Premium currency, obtainable through Chests/Supplies. Used to purchase upgrades.
Bundle – One-Off upgrades purchased with Crystals. Usually on the more expensive side.
Chests/Supplies/BBot – Majority of Crystals and Tokens come from here. These become a huge component of the game when tied with NoAds IAP.
Achievements – Milestones that are unlocked for reaching certain criteria such as x amount of Cash
IAP – In App Purchase
Pack – IAP for real $. Starter / No Ads / Mega Market / Data / Singularity / G-Corp / Taskmaster / Crystals
Task – Minigames for Time Skips and other bonuses.
Time Skips – Gained from completing Tasks; 3/5/10 min time skip with 1/2/3 G-Corp cycles
SR – Simulation Reset (for DC)
DC – Data Cubes (Gain from SR)
DCM – Data Cube Milestone (Purchased with DC)
SE – Singularity Event. 2nd Prestige layer for powerful perks.
SC – Singularity Cubes Derived from DC. Used to purchase perks.
Perk – Nodes obtained in the SC Perk Tree for big boosts
GCorp – Gamma submenu
GP – G-Corp Points
c[#] – Companion # in G-Corp (c14 etc)
Corvus Funding – Helion Submenu
Tiberius Colony – Ixion Submenu
Alright, We’ve set the stage. Let’s move on to the game mechanics.
Level Explanation
Levels!? In… In Some Exotic Particle Simulation Idle Game?!
That would be correct! The experience you gain for levels is based on your total sold Alpha Energy. The amount of Experience required can be reduced with bundles and IAPS. This is further affected by Energy Price Multipliers, and Buyers in the Market. But keep in mind – YOU MUST SELL ALPHA ENERGY. Otherwise you will not accumulate experience towards your levels.
Levels give bonuses in two ways. Level Rewards, and TP/LP.
Level rewards occur every few levels, fairly often. They include Premium Currencies, permanent boosts to other mechanics, and eventually also unlock the Talent Tree.
TP/LP are used for Automation and at level 50 can be split into a Talent tree, further empowering you. You can read more on Talent trees in ISEPS in this Guide.
It should be noted that: Any excess Alpha sold past the level in one go is lost.
I.e, you have 10k$ worth of Alpha Energy. A level takes 1k$. The 9k$ remainder does not carry over.
ISEPS Level Rewards
Level 7 provides the Egetuarium. It allows you to purchase Artifacts with Alpha, Beta and Ceti outputs and turn them into AP or DC gains.
Level 18 provides the new menu in the “Infinity Upgrades” menu for the “Expansion Series”. This new menu will provide you with options to bolster your outputs from Beta Lab, Egetuarium, Archive Institute, City of Tomorrow, Fenix Institute, and the Corvus Funding.
Level 22 provides you with the new-found ability to perform Singularity Events when you reach a certain threshold. After your first SE and acquisition of your first Perk, you will unlock the “Brain Implant” SE-related Item, which unlocks the menu for Infinity Multipliers.
Level 36 provides you with a third tab in the Infinity Upgrades menu, the Infinity Ultima upgrades. These provide significant bonuses to certain aspects for each tier, most notably DC and EP gains for Tier 1. Each further tier in progression provides a different bonus to one or several particles and also provides a multiplier for the previous tier; Tiers beyond the first are locked behind levels, like Tier 2 at level 40 and Tier 3 at level 48.
Level 50 provides you with access to the Talent Tree. The Talent Tree starts off by needing 53 LP spent in Automation before you can continue; There’s two trees in there. After unlocking this, most TP/LPs will go into here for significant buffs.
Starting with Level 60, every 10 levels provide some large, static buff. At 60/80/100/130, it’s 2x GP for Conversions; 70/90/115 are 1.5x SC earned and at 100 you receive both 1.5x SC AND 2x GP. You can see all level rewards in Player Overview menu
Cash

Cash makes the world go round. In this game, Alpha Energy is considered that currency. You can only gain this from selling Alpha. It’s upgraded through the Market upgrades, EP and Buyers.
Cash is used to buy research and to upgrade all the particles. As Beef would say, “Cash is King”
Researches
The first upgrade submenu you’ll have is for Research. You’ll slowly be unlocking these throughout the game, and they give quite hefty bonuses. Always buy them when you can.
Particles (Early Game)
This is the meat of the game! It’s the Pretty colors and the reason we’re all here! If you want to discover these yourself, skip over the particles you don’t want to know about!
Alpha: The Money Maker
This is the first and main Particle of the game. Distinctly Red, Alpha sells for EP and passively generates DC, necessary to progress the game in every aspect. Many say it’s the most important particle to upgrade at first. Since it’s the only particle that directly impacts Data Cubes, neglecting it will slow down your progress a lot.
Alpha has 3 upgrades:
- Spawn Rate – Spawns more particles per second.
- Lifetime – Particles stay alive longer.
- Velocity – Particles will move around, appearing longer.
Alpha is used in:
- Egetuarium
- The only source of Cash

Beta: Blue Goo
Beta is a very different particle from Alpha. For one it’s blue. It’s also the first particle you’ll see that doesn’t directly give progress, but instead boosts Alpha via the Lab. Because of its effect on Alpha, it shouldn’t be ignored. It’ll be the only particle to directly impact Alpha at this scale.
Beta has 4 upgrades:
- Spawn Rate
- Lifetime
- Attraction
- Sphere Size
Beta is used in:
- The Lab
- Egetuarium

Ceti: Sparks
The Ceti Particle is similar to Beta, but not nearly as useful. It impacts Beta instead of Alpha through the Archive Initiative, meaning it’s impact falls off when taken into relation to Alpha, Cash, and DC. Upgrading this is helpful, but not as critical as the first two. Ceti does become more powerful again once Ixion unlocks, since it’s a resource used in conjunction with Ixion.
Ceti has 4 upgrades:
- Spawn Rate
- Lifetime
- Intensity
- Trail Life
Ceti is used in:
- Archive Initiative
- Egetuarium
- Ixion Menu

Delta: What does this even do?
Delta has to be one of the weirdest particles at the start of the game. It does nearly nothing until well past early game(Level30+) What it does do is boost the bots purchased with Ceti under the Archive initiative for more Beta, to then eventually upgrade the lab and boost Alpha. Starting mid-game however this particle gets used by most other menus, and proves to be one of the most powerful particles. It definitely has its place.
Delta has 2 upgrades:
- Spawn Rate
- Lifetime
Delta is used in:
- Archive Initiative
- Corvus Funding

Epsilon: My Personal Favorite
(What I consider) to be the last early game particle. After you get the hang of this particle, you should have a solid understanding of the goal of this game, and what you’ll want and need to progress to later stages.
Epsilon starts off slow, but the effects are immediately noticeable and very gratifying. Epsilon feeds into the Archive Initiative and the CoT, the latter of which improves output of the first 4 particles. It’s not as good at increasing Alpha as Beta, but it does help increase output, which is why it feels very powerful and useful. It also looks gorgeous.
Epsilon has 4 upgrades:
- Spawn Rate
- Duration
- Burst Size
- Attraction
Epsilon is used in:
- Archive Initiative
- CoT
More particles will show up, but don’t fit very well into Early Game, since they’ll require an understanding of other mechanics to obtain. Particles (Advanced) Has the next set of particles, and more in-depth information for current ones.
Simulation Resets and Data Cubes
“I need bigger numbers to do what I want!”
To help facilitate progress, once you get far enough with Alpha Particles you can do a Simulation Reset. This is how you gain Data Cubes, leading into the next parts of the game.
You can refer to ISEPS Singularity and Simulation Reset Guide for more info or watch the video.
Simulation Resets (SR)
Simulation Resets will Reset the Particle Levels and expend all their attached resources to their minimum while giving you Data Cubes for your hard work. You’ll keep Crystals, Tokens, and Data Cubes, along with upgrades ranking above the Data Cube upgrades. Doing SRs depends on what you stand to gain. When DCMs and certain upgrades are available, or when progress slows down, you’ll usually want to SR.

Data Cubes (DCs)
The rate at which you gain Data Cubes is based on your current Alpha Generation. This is the reason why Alpha generation is so important. Selling Alpha will not decrease the rate at which you gain DCs. If you feel stuck, check for ways to increase Alpha(via Beta, Epsilon etc etc). The idea is to continuously increase the amount of Data Cubes you receive every Simulation, and to then spend Data Cubes in various menus to then create more Data Cubes Faster.
It’s also important to remember DC isn’t yours until you perform an SR. By nature, all DC upgrades will be retroactive.
Data Cubes are used in:
- Milestone Upgrades
- Infinity Upgrades
- Infinity Multipliers
- Singularity
These cannot be ignored. Every single one of these menus impacts the game on a huge scale.
Milestone Upgrades
These work similar to Researches, but they use DC to give huge benefits/gamechangers. Often these will have priority over all other DC upgrades.
Infinity Upgrades
Infinity upgrades start off with Particles, as you unlock them. You’ll see Output at the top for each particle, and Upgrade Cost Reduction right below. Output takes priority over Cost Reduction! This is due to some math basics we’ll go over in later sections. Keep the upgrades in the order of priority for particles, so for example, upgrade Alpha Particles before Ceti/Delta. You’ll want to bolster your money-maker more than the 2nd-in-line chumps!
Eventually you’ll unlock the Expansion Series, which functions similarly but for submenus. Treat this the same, but this menu generally has priority over Particles. Output>CR, Scientists>Bots. Etc etc. Always try to look ahead for “Which upgrades will increase my total Alpha Output the most?”
Submenus: Lab, Initiative, Egetuarium, CoT
Lab
The Lab is amongst the first submenus you’ll unlock. It’s fueled purely by the Beta Goo you generate from Beta. The Lab acts as a direct multiplier
on Alpha! The Alpha output is increased by Scientists, which are boosted by Equipment and Morale. Only Beta increases the Lab, so it’s worth investing most of it here.
Initiative
Unlike the Lab, the Initiative won’t get as much love. It functions similar to the Lab in that you have a main component(Bots) increasing output of a particle(Beta). The bots are bought using Ceti, and can be boosted with Delta and Epsilon. The big difference is that the Initiative doesn’t have any direct connection to Alpha. Keep the Initiative upgraded, but keep closer tabs on the Lab.
Egetuarium (Ege)
This submenu is nothing like the others. It comes out of thin air! You’ll unlock this at Level 7, and it both sounds and looks very
weak initially. The Egetuarium will give a handful of upgrades to
All-Particle(AP) and DC using Artifacts bought from Particles, but nothing seems that significant here.
Do not ignore this menu though!!! It grows very powerfully. Initially you’ll only get a few artifacts, using A, B, and C particles. If progress feels slow, check here.
You’ll want to spend artifacts close to a 1:1-1.4:1 ratio into AP:DC! Those are the numbers we’ve found work best for progressing.
City of Tomorrow (CoT)
Similarly to Ege, the CoT will feel slow at first. It’ll feel great too though, because you’ll increase the output of all previous particles significantly at this point in the game. Even a few upgrades will rocket you forward, which will feel nice. Since Epsilon won’t do much else other than the Initiative, always feel free to throw levels into this. Eventually Fenix will get funneled into here as well.
These are the 4 menus aside from DC-related menus to check out if progress feels slow and you forgot something.
Tasks and Timeskips
Update 0.6.9 Added Tasks for us!
Tasks are active minigames that appear every few minutes, letting you gain free Time Skips and unlocking bonuses after completing x amount. First, let’s start by explaining the 3 different types of tasks and how to do them:
Enter Password. This one is quite simple, you just need to put the numbers on each stage in order.
- 1-2-3-4-5-6-7-8-9
- 2-4-6-8-10-12-14-16-18
- 3-6-9-12-15-18-21-24-27
- 4-8-12-16-20-24-28-32-36
- 5-10-15-20-25-30-35-40-45
Input Data. On this Task, you will see a number in a box; you need to tap the big button (“TAP HERE”) as many times as it takes to get the smaller number to the right (“CURRENT NUMBER”) to the same number as the one above it (“NUMBER TO MATCH”) and then click “Input Data”.
- “Terran Quiz Show” Answer 5 questions in a row with “True” or “False” according to the statement. Answer incorrectly, however, and you’ll be sent back 1 stage, so do your best! Hint! Mashing one answer works.
- “Memory Card” Select 2 cards to flip them over, if they match, you continue until the whole board is matched with their pair and it continues. There’s 3 stages with 6, 8, 12 cards respectively. (NEW as of 0.7.0)
These tasks will show up once every 400 seconds (6 min 40 seconds) under the same kind of timer as the chests; so if you click on it within that timer, you can get another one while in the middle of a Task.
Time Skips are permanent; once you have acquired them, you will never lose them until you use them. Then they are expended to give you the corresponding rewards. They’re located under the Toolbelt menu.
- 3 Minutes/1 G-Corp Cycle – 50% chance to receive.
- 5 Minutes/2 G-Corp Cycles – 35% chance to receive.
- 10 Minutes/3 G-Corp Cycles – 15% chance to receive.
After you start to earn some Time Skips, that’s when things can start to change. The whole point here is to reward active gameplay with something more to do. The rewards are very good. Tasks spawn indefinitely and are completely free. No ads, just a little bit of your time while playing ISEPS and you’ll earn some extra stuff! And all you have to do is be level 4 to start seeing them pop-up! Isn’t that wonderful?!
Note: To find this menu, you must close the bottom panel of menus by clicking on “UPGRADES” or “MARKET” or “PARTICLE” two times in a row to close it. Then you will see the “Toolbelt” described above.
The Toolbelt also holds permanent upgrades related to Tasks. These are powerful one time upgrades such as 1.5x SC, 2x GP. Every Task Helps! These permanent buffs unlock at 5, 10, 20 etc. Tasks completed. This is totally cumulative so you need only get to that amount of completed tasks to forever obtain that reward!
Rewards: (0.6.9)
5 – Alpha Output +5% (1.05x Alpha Output)
10 – EP +5% (1.05x EP)
20 – 3 3min Boosts
42 – EP +10% (1.10x EP)
69 – Beta Output +25% (1.25x Beta Output)
100 – DC +10% (1.10x DC)
111 – 7 5min Boosts
142 – Ceti Output +100% (2x Ceti Output)
169 – EP +15% (1.15x EP)
200 – 6 10min Boosts
222 – Delta Output +100% (2x Delta Output)
242 – Arch-Bots Construction Amount +100%(x2 Arch-Bots)
269 – 13 3min Boosts
300 – Epsilon Output +100% (2x Epsilon Output)
333 – Scientists Hire Amount +100% (x2 Scientists)
342 – Artifacts On Buy +50% (1.5x Artifacts on Buy)
369 – Beta Output +100% (2x Beta Output)
400 – 10 5min Time Skips
444 – SC +5% (1.05x SC)
500 – Fenix Output +100% (2x Fenix Output)
POST-0.7.0
650 – 21 10min Time Skips
800 – EP +50% (1.5x EP)
950 – Outposts Output +100% (2x Outpost Output)
1100 – 48 3min Time Skips
1250 – 500 Crystals
1400 – Beta Output +100% (2x Beta Output)
1550 – 50 5min Time Skips
1700 – G-Points +100% (2x GP)
1850 – SC +50% (1.5x SC)
2000 – 60 10min Time Skips
I want to say here that I strongly recommend completing tasks as much as you can while playing ISEPS. They are HUGE for progression
A more in-depth guide to Tasks and Boosts (with answers!) can be found by clicking on this link!
Chests and Timers in ISEPS
First, each of the 3 related items – Tasks, small chests and large chests – each spawn on their own unique timer. 400 seconds, 180 seconds and 600 seconds, respectively. These timers work by counting down ONLY while the game is open and running. As soon as that item has spawned on your screen, the timer resets back to its starting position (400s / 180s / 600s) and begins counting down again.
!! That means if there is still a Chest or Task to collect when the timer runs to 0 again, it will replace the already existing Chest/Task, meaning you have lost out on that one. !!


Achievements
Achievements are very simple milestones that offer various rewards for completion. There are currently 3 tiers of achievements, each offering more and more rewards.
Tier One Offers:
- 10 Crystals
- 2 Tokens
- 1 Task Skip Ticket
- 5 Achievement Points
Tier Two Offers:
- 30 Crystals
- 5 Tokens
- 2 Task Skip Tickets
- 10 Achievement Points
Tier Three Offers:
- 50 Crystals
- 10 Tokens
- 3 Task Skip Tickets
- 15 Achievement Points
You’ll also notice there’s an actual Achievement counter in the menu. These don’t do much at the moment, but are still fun to collect. The rewards collected will add up and help boost you significantly.
The Achievement menu updates every minute or can be refreshed manually!
Crystals, Tokens
Crystals and Tokens are the two main “Premium” currencies. The idea is simple, since they both spend similarly. You’ll gain either of these resources, and can use these to purchase various upgrades(Outputs, Multipliers, Cost Reductions Etc.) Their impact is HUGE though and shouldn’t be taken lightly. Just a few upgrades in the simplest output upgrades can launch you several OoMs and eventually Singularities ahead.

Crystals
Crystals are obtained in two ways: Chests/Supplies or Achievements. Chests offer either 4 for a small chest or 8 for a large chest. With no ad limit, hourly you can max out at 128 crystals just from chests. It’s interesting to note that the smaller chest gives more crystals over time.
Supplies function a bit differently. Starting out, you can receive 2 Crystals per use, capping at ~17 per hour. Using tokens though you can upgrade your output in increments of 1 to a total of 5 every 7 minutes, or ~42.5 an hour. (Total cost for upgrade: 1800 Tokens)
Just from chests/supplies, you can total about 4,000 crystals a day, given that you actively open them as they become available. Ads are limited though without the No-Ads IAP.
You might want to check out Crystal Upgrade Priority List to plan your Crystal Spendings.
Tokens
Tokens don’t work exactly like crystals do. They’re rewarded for different reasons: Ads. Every ad is supposed to offer one token to start off with. That means you can receive Tokens from Chests, Supplies, BBot, +20% DC Boost, and even the (Not recommended) TP/LP Refund. Your main way of receiving tokens will be Chests/Supplies/BBot.
Chests give 1 token, and 2 tokens for their size respectively. Combined, chests only give 32 tokens per hour. That being said, every bit counts and this quantity adds up at all stages in the game.
Supplies give 1 token initially, but just like with crystals on supplies, you can upgrade this amount using the tokens. The Extra Tokens upgrade should be seen as an investment. Extra Tokens is a very safe and reasonable upgrade, paying for itself and then permanently increasing Token output. At 20 levels with increasing costs, you’ll output a strong 3 tokens every 7 minutes, or ~25.5 an hour.
- If you were to upgrade all levels at once for 4k, and hit supplies perfectly, the extra tokens avg 17 an hour.
- With 17 an hour, costing 4000 initially, the return for this upgrade is 4000/17 hours, 235.29 hours.
- That seems like a long time to return itself, but the game is an idle game designed for this. Realistically with sleep and life, expect this upgrade to finish it’s return after about a month.
- After that this upgrade will forever benefit you with 3x tokens from supplies!
BBot works similar to the Supplies, but with a caveat. Initially it’ll give 1 token every 20 minutes. In order to unlock extra tokens, you’ll have to finish the “Total Durations” upgrade. Once both upgrades are maxed, BBot gives 10 tokens every activation(hour)
- The Total cost is 4,825 for maxing token output.
- With how the upgrades work, if you’re aiming for more tokens it’s worth waiting until you can max Total Durations and add 4 levels to output. This will “break you even” on gaining Tokens/hour. Cost for this: 1010 Tokens.
- Before this, upgrading duration will actually lose you tokens/h.
- With a gain of 7 Tokens/Hour, it takes an astounding 689.28 hours of perfect inputs to start making a return. Thats almost a month!
- Because of this, choosing to get this upgrade varies for every player. Realistically with sleep/life, this upgrade takes months to repay itself, and even then it won’t be your main source of tokens.
- Because of the payout, this token upgrade is very low in priority.
Total, you can receive ~67.5 tokens an hour. These will be used to maximize specific outputs for the individual particles.
Great. What do I buy with Crystals/Tokens?
Congrats on having resources! These aren’t the easiest to get and you’ll want hundreds of thousands of both in order to max out the shops. Obviously with all that hard work, you’ll want the most out of it. The community has made a very very powerful guide in order to aid this. If you want to guarantee your crystals are well spent, it’s a good idea to follow guide which is wip currently.
In-App Purchases – IAPS in ISEPS
IAPs have been becoming a bigger and bigger topic as the game grows, and for obvious reasons. ISEPS Does NOT need IAPS to be playable, and I mean that on a serious note. Everything in the game is within reach and plays completely fair without them. IAPs only help to speed up reaching these goals. We won’t be discussing whether or not you should buy IAPS. I’ll only refer to the most impactful IAP for this part of the game. Others will be covered later in more detail.
No-Ads
This IAP is a gamechanger. There’s no question about it, if there’s any IAP to get, it’s this one. No-Ads removes the ad limit and lets you skip the ads while getting the rewards. Indirectly, that means you’ll have a reliable source of Crystals and Tokens. With how powerful those resources are, and how No-Ads is valued, you’ll definitely get the biggest bang for your buck on this one.
The Only downside to this pack is that you won’t see any immediate improvement in your particles/menus. This Pack gets better the longer you play.
Other Packs
- Starter Pack
- 1.5x Alpha
- 1.5x Beta
- 750 Crystals
- Taskmaster
- 2x Task Completion(retroactive)
- 750 Crystals
- Talent Pack
- +10LP
- 2x XP
- 1000 Crystals
- Mega-Market Pack
- 1.5x EP
- 2x Buyers
- 2000 Crystals
- Data Pack
- 2x Data Cubes
- 3000 Crystals
- Singularity Pack
- 2x Fenix Fires
- 1.5x Singularity Cubes
- 5000 Crystals
- G-Corp Pack
- 2x Gamma Cores
- 2x Gamma Points
- 2000 Crystals
Singularity
Congratulations! You’ve made it to a huge milestone in the game. From here on out, the whole dynamic of what you want to achieve changes.
**Important** The guides are just that, a guide. Or a suggestion. The choices listed as best or “Meta” choices are what the community has found to be the most effective. There are choices in this game that will hardwall you, and strategies that differ in weeks/months of playtime. Singularity Perks are part of these strong choices, and sometimes aren’t cheap to reset. You are completely free and have full support when selecting perks, so don’t feel intimidated to break off of the path, but be aware it’s likely not as efficient as what we have.
To start, an SE is a total wipe for everything EXCEPT your premium currency (crystals & tokens, tasks completed), SC-related things and some GCorp elements.
EVERYTHING ELSE resets upon an SE. It sounds daunting and like a lot of work will be lost, but you’ll catch up and shoot ahead in no time with SEs.
Because of that, the first 8 Singularities should be done immediately, without hesitation. Every perk you acquire is going to help you skyrocket in progress. As for the first cube and where to spend it, the common consensus is Red is the optimal path to begin with, followed by jumping to White. So, the best route is R1-R2-W1-W3. The full list is at the end of this section.
When resetting for SC, you cannot perform an SE without meeting the required SC. Overshooting doesn’t progress your next SE. SE requirements grow in powers of ten, so SE0 takes 1 SC, SE1 takes 10, SE2 takes 100 etc.
If you feel like you’ve made a wrong choice in selecting perks, you’re able to reset Singularity Perks for 500 Crystals.
This immediately ends your current SE and you forfeit your pending cubes! If you’ve spent a few days in an SE, are 99% done, and you refund, you’ll have to restart the whole SE.
!!This decision should not be made on a whim!! Explore your options first, or ask others. It’s expensive in both crystals and time.
!!Do not SC dump before you’ve reacquired your perks!! This will set you back to Pre-SE!
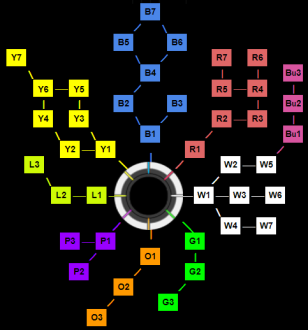
Singularity Perk Tree
The Singularity Perk Tree is read clockwise from 12’, and numbering along every individual color. The Center shows your accumulated DC bonuses for SEing.
| B1 – Intelli-chips | O1 – Fenix Nutrition Supplements |
| B2 – Cool Scientists | O2 – Rebirthobot |
| B3 – B-Bot | O3 – DNA Infusion |
| B4 – Beta-Coated Coats | P1 – E-Gel |
| B5 – Cool Scientists Expansion Plan | P2 – Solution Boy |
| B6 – Equipment Production Efficiency | P3 – 9G Network System |
| B7 – Lab-2-DC Converter | L1 – Elixir of Ege |
| R1 – Cybernetic Brain Modifications | L2 – Relic of Reflection |
| R2 – Smart AI Assist | L3 – Deltantlers |
| R3 – Improved Automation Tech | Y1 – Site-Scanner Drones |
| R4 – Overclocked Automation | Y2 – Archive Experts |
| R5 – Alpha Singularity Servers | Y3 – COT-Tech Excavators |
| R6 – Research Equals Solutions? | Y4 – Wasta Moon Exploration Plans |
| R7 – Data Cube Research Targeting | Y5 – Construction Breakthrough |
| W1 – Inner Focus | Y6 – Knowledge Hotspots |
| W2 – Singularity Projector | Y7 – Archeology-2-DC Converter |
| W3 – DC Watch | Bu1 – Helion Accumulator |
| W4 – SC Watch | Bu2 – Helion Generator |
| W5 – Monetization Bot | Bu3 – Helion Satisfactory |
| W6 – DC-Scanner | G1 – G-Bot |
| W7 – SC-Printer | G2 – G-Drillah |
| G3 – G-Kicks(Your Companions Will Love You) |
For now, the recommended path for best perks is in this order:
R1, R2, W1, W3, B1, B3, B2, L1, W4, L2 | P1, P2, L3, W2, W5, Bu1, Bu2, Bu3, G1, G2, G3, R3, R4, R6, R5 | R7, B4, B6, B5, B7, W7, W6, O1, O2, O3, Y1, Y3, Y2, Y4, Y5, Y6, Y7, P3
There’s a Split (“|”) between the different Eras(sections) of the game. SE1-10, SE11-SE25, and SE26+
Following this ensures you’ll keep steady progress without having to respec, so it’s referred to as the Non-Respec Meta Perk Tree.
Although after recent patches respec doesn’t cost Crystals anymore, so its recommended to follow ISEPS Perk Guide, that can be found in the ISEPS Tools
You can also refer to this video for more details on how to use tools and on your first major Singularity reset.
FAQ (Pre-SE)
- Should I keep my basic automation running all the time?
It really depends. Usually if you’re aiming for a goal(research, particle unlocks etc) You may want to turn it off temporarily to help save up.
It’s also worth noting that keeping Automated Selling on helps prevent Experience being wasted(see leveling)
Most often, you’ll likely find yourself idling with it on.
- How often should I reset for Data Cubes?
In the beginning, Resetting for a Milestone is a safe bet. However, DCMs soon become more and more spaced apart, making it difficult to wait that long. As a Simulation slows down, you’ll want to SR for Infinity Upgrades, and Expansion Series. Eventually also Ultima and Infinity Multipliers.
SRs shouldn’t last much longer than 1-1.5 days at most! This is at almost any point in the game, unless you’re saving for GCorp.
- Need more Questions. Ping @Snek#8717 if you think something should go here!
Getting to this point means you’ll have the basic building blocks and ideas of this game. With how much there is to just the beginning of the game, It’s always important to not feel overwhelmed with information.
Guide is created by Snek#3114 from official ISEPS Discord
Conclusion
If you need more guides on ISEPS, check out out ISEPS Guide Collection and if you want your guide posted, contact me in the Discord
Check out other ISEPS Guides that you might find useful
- ISEPS Beginners Guide
- ISEPS Singularity and Simulation Reset Guide
- ISEPS Talents guide
- ISEPS Beginner Tools (Crystals, Perks & Talent calculators Etc)
- ISEPS Tasks Guide
 The Soviet Gaming
- 3 Comments
- ISEPS
- January 3, 2022

 (6 votes, average: 4.17 out of 5)


game had a big update is this still up to date ?
Hi there, quick question. How do I synchronize my progress with Google play services? I tried logging into android emulator on PC with the same Google account, but it starts the game from scratch and I can’t seem to synchronize it. Thanks for your help!
[…] ISEPS Beginners Guide […]